Manage Contracts
A Contract is a service instance that has one or more Customer IDs associated with it. The bank user can create a Contract from the Spotlight application, based on the set of access permissions a user has. The bank user can select the related companies from the list that must be a part of the Contract, or the user can also select an unrelated CIF to be part of the Contract.
Menu path: Customer Management > Contracts
The app displays the search screen where you can search for banking contracts. This also is the main page of the Contracts component.
You can do the following:
- Search for a Contract
- Add a Contract
- View Contract Details
- Edit Contract Details
- Manage Enrollment Requests
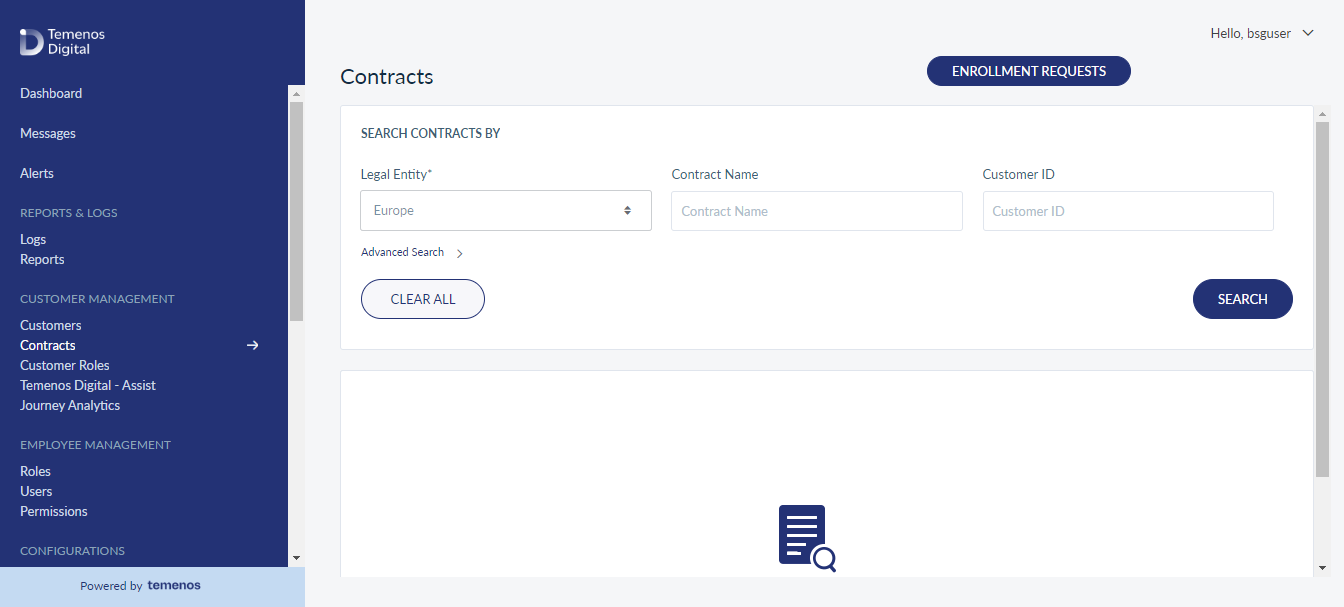
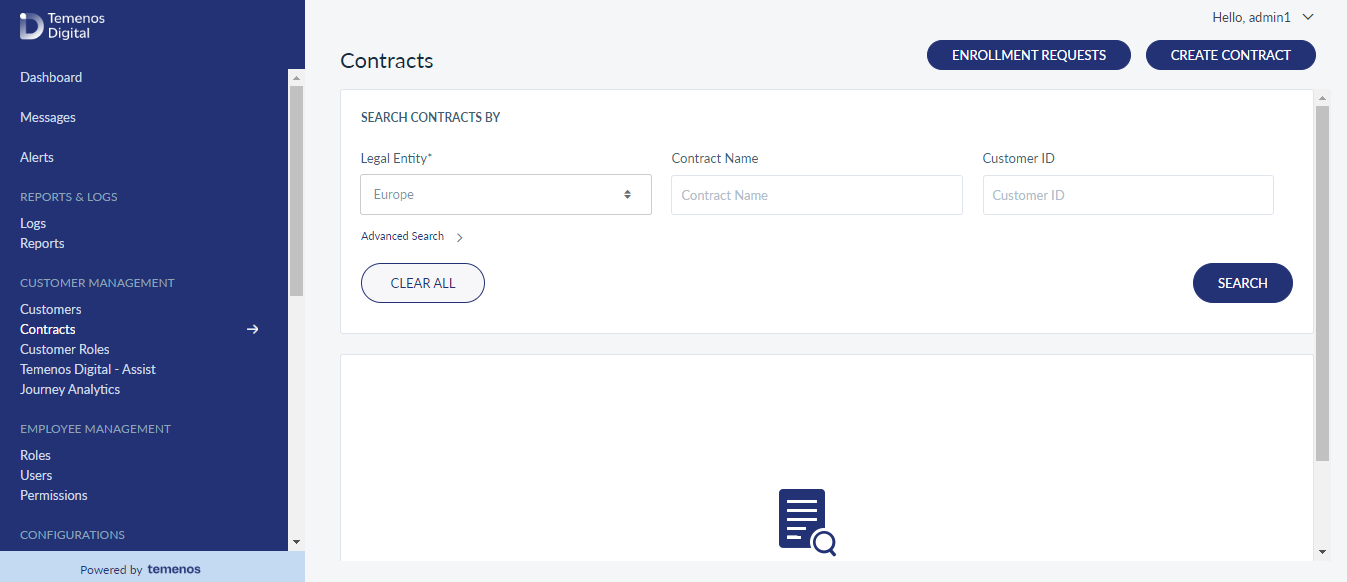
Search for a Contract
Use the Search option to find a particular contract using the following search criteria:
- Contract Name
- Customer ID
- Customer Name
You can also use the Advanced Search option and narrow the search results and find the exact contract you are searching. Following are the advanced search parameters:
- Contract ID
- Email ID
- Phone Number
- Country
- Service Type
Menu path: Customer Management > Contracts
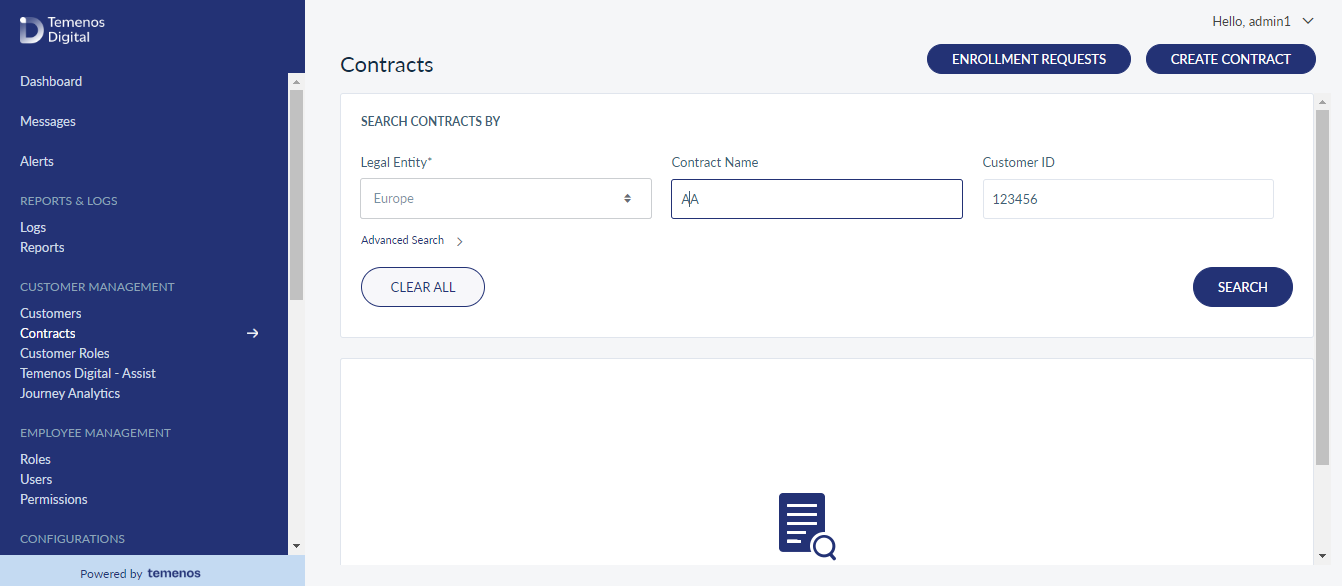
You can also search using a combination of multiple search criteria. You can enter the contract name in full or in part. Click Search.
The application displays the list of contracts matching the search criteria. If no matching records are found, it displays an appropriate message.
The companies list is represented as rows with the following details:
- Contract ID
- Name of the contract.
- Type of Service
- Email ID
The list is sorted by Name by default, but you can sort the list based on the Email column by using the sort icon.
You can do the following from the Contracts main page:
- Click Create Contract to add a new contract.
- Click any contract record in the list to view the contract details (profile).
- Click Enrollment Requests, to approve or reject the business enrollment requests received.
Add a Contract
Use the feature to create a banking contract.
Menu path: Customer Management > Contracts > Create Contract
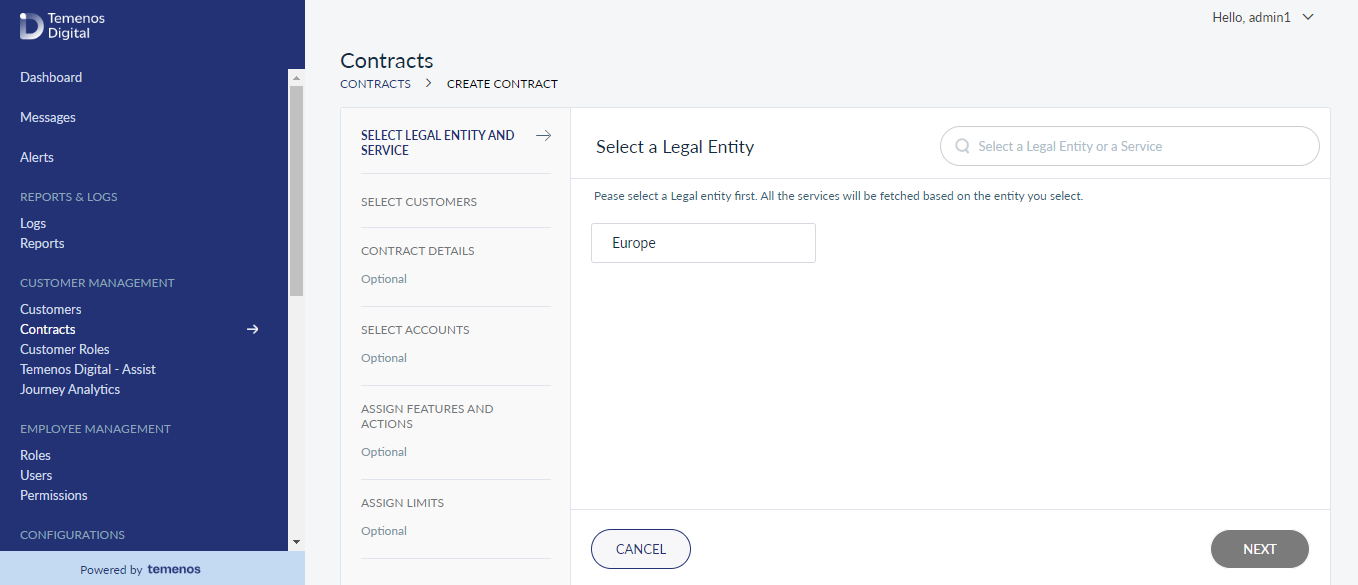
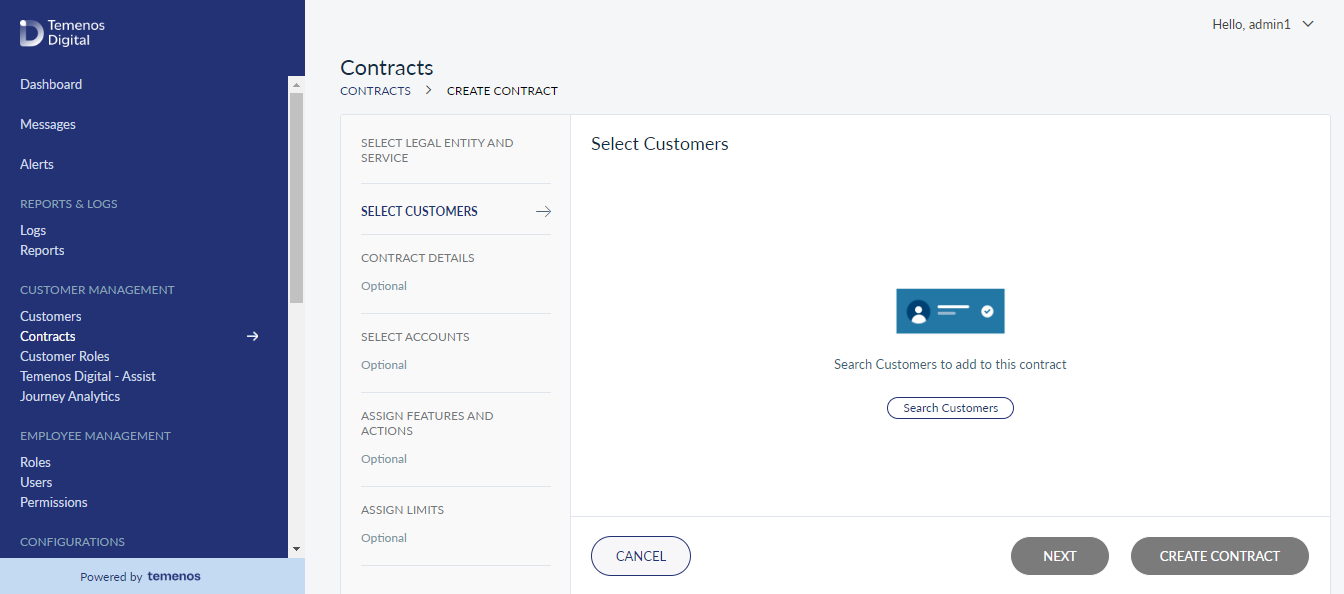
The create contract screen comprises six steps to capture the required information - Select Service, Search Customers, Contract Details, Select Accounts, Assign Features and Actions, and Assign Limits. The Contract Details, Select Accounts, Assign Features and Actions, and Assign Limits steps are optional.
Select Service
The Services section displays the list of services that are created in Service Definition Configurations section. You can view the name of the service and the service type. The service type is represented by the tags that are available in each service. You can also search for the required service by its name using the Search feature.
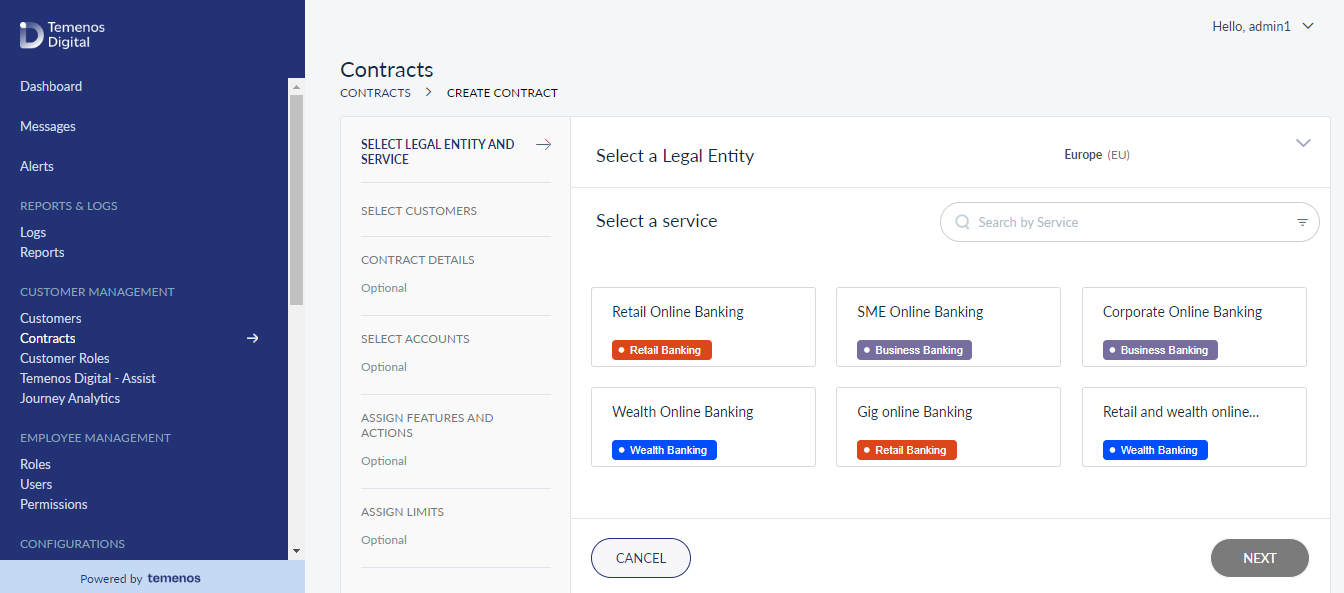
Select Service
The Service Definitions that are in active state and associated with atleast one customer role are displayed here.
Select the type of service you want to associate with the new contract and click Next.
Search Customer
While creating a new contract, you can associate active customers to the contract. You can do the following to search for a customer:
- Click Search Customers. The search window appears.
- Provide the following information to search for a customer and click Search:
- Customer ID - Provide the customer's CIF number.
- Customer Name - Full name of the customer.
Additionally, from the Advanced Search section, you can search for customer(s) by Phone Number, Date of Birth, Country, State, Zip code.
- The list of customers matching the search criteria is displayed. Select the required customer. If the selected customer has a list of related customers in the core, then the same will be listed with the relationship. Select the required customer and click Add. If you want to add more customers click Save and Add Another.
- After you click Add, you can view the list of selected customers. Select Set as Primary option for any listed customer. Click Select Customers if you want to add more customers to the contract.
You cannot add a customer to a new contract who is already part of another contract.
All the next steps are optional as the details related of the customer that was set as default are applied automatically to the fields in the next steps (Contract Details, Select Accounts, Assign Features and Actions, and Assign Limits). You can click Create Contract and finish the flow.
Click Next if you want to view the Contract Details.
Contract Details
Based on the customer you have selected as default, the information in this section is auto-populated and you can only edit the Contract Name.
Select Accounts
You can view the list of accounts that are associated with the selected customers. By default, the primary customer's account details are displayed and all the accounts are selected.
You must select the customer from the list to view the related accounts. All the accounts are selected by default, you can uncheck the required accounts. You can view the following information about the accounts:
- Account Number
- Account Type
- Account Name
- Ownership
All the accounts that are selected will be associated with the contract. All the customers associated with the contract must have atleast one account added in the contract. If not added, that customer will be automatically removed from the contract.
Assign Features and Actions
To view the list of features and actions associated with the customer, you must select the customer.
The list is displayed based on the Service Definition you have selected in the Select Service step, and the configurations set in the Service definition are applied to the customers in the contract automatically. From the Customer ID list, you can select the required customer to view the associated features and actions.
If required, you can uncheck any action related to a feature and click Next. You can also update the permissions in bulk across all customers in one go using Update Permissions in Bulk. Following are the steps to do that:
- On the upper-right corner of the screen, click Update Permissions in Bulk.
- Select the required customer ID.
- From the Features list, select a feature.
- From the Actions list, select an action.
- From the Permission type list, select Enable or Disable.
- Click Apply Changes and the action permission is updated across all customers.
- If you want to apply these permission to only few customers, then from the Selected Customers list, select the required customers and click Save.
Enabling Features and Actions on an Online Banking Contract
As a Bank, when a new feature / action is enabled for a contract, all the users who have access to the contract will be inheriting this new feature / action.
By definition a Contract can only allow for the features and actions that are accessible based on the Online Banking Service that the Contract is created from.
Follow the below steps:
- Edit Contract from Spotlight and Add one or more new Feature(s) / Action(s).
- If there are monetary actions added, limits will automatically be added for these actions as well.
- Update the Contract.
- Scheduled jobs will automatically be initiated and started based on their configuration.
Assign Limits
The Assign Limits tab lists the selected features that involve transactions.
The user must select the customer from the drop-down to view the limits associated with the features. The list is displayed based on the Service Definition you have selected in the Select Service step, and the configurations set in the Service definition are applied to the customers in the contract automatically.
From the Customer ID list, you can select the required customer to view the associated limits. You can change any limit if required and click Create Contract. You can also update the limits in bulk across all customers in one go using Update Limits in Bulk. Following are the steps to do that:
- On the upper-right corner of the screen, click Update Limits in Bulk.
- Select the required customer ID.
- From the Features list, select a feature.
- From the Actions list, select an action related to the feature.
- From the Transaction type list, select the type of transaction to which you want to update the limit.
- In the Value field, provide the updates transaction limit.
- Click Apply Changes and the action permission is updated across all customers.
- If you want to apply these permission to only few customers, then from the Select Customer ID list, select the required customers and click Save.
View Contract Details
Use the feature to view and edit the profile details of the selected contract.
Menu path: Contract > Search a Contract > View Contract Details List
Based on the search criteria you provide, details appear in the Contracts screen:
The contract details include the following features:
- Contract ID - The virtual Id created for the contract in the DBXDB.
- Contract Name - The name of the contract.
- Services - The Business type. For example, Business Banking, Retail Online Banking etc.
- Email ID - Email address details of the contract.
Click on a contract to view the profile information.
The Contracts component displays the profile information such as Contract ID, Service Type, Service, and Contact Information (Phone Number, Email ID, Address, Country, and Zipcode). In addition, it also includes the following:
- Accounts: Displays the list of mapped customers within the contract.
- Features: Displays the active features within the contract.
- Limits: Displays the transaction limits set for the features.
- Users: Displays the list of users associated with the contract.
- Signatory Groups: Displays the basic details of the signatory groups for the customers within the contract.
- Approval Matrix: Displays the summary of Approval Rules for each customer within the contract.
You can also search for the customer accounts using the Search field. Enter the Customer Name, Customer ID or the Account Number in the search field and press Enter.
Accounts Tab
Displays the list of mapped customers with the contract and the following details are displayed:
- Customer Id (applicable for customer centric core)
- Tax ID
- Address
You can also view the accounts related to each customer that are associated with the contract. The following information is displayed related to each account:
- Account Number
- Account Type (Savings, Checking)
- Account Name
- Ownership Type
- Status (Active, Closed, Frozen, Dormant)
Sort the list using the sort icon.
Features
Features tab shows the active features associated with the customers in the contract.
usiness users can perform appropriate activities on the accounts based on the features associated with its related customer. These activities include personal finance management, bill payments, funds transfer, applying for a loan, requesting for new bank account and so on. A group of actions are bundled into each feature which more or less have similar functions as their parent feature. The grouping of features and a set of actions mapped to each feature helps in better classification of banking activities and easy maintenance by the bank employees using the Spotlight application.
This tab displays the list of mapped customers with the contract and the following details are displayed:
- Customer Id (applicable for customer centric core)
- Tax ID
- Address
You can also view the list of features associated to each customer. You can expand each feature to view the list of actions associated with the feature. The following information is displayed related to each action:
- Action name
- Action description
- Status of each action
Limits
The Limits tab details the transaction limits set for the features.
Only those features will be shown which were selected while adding a contract and involve transactions such as bill payments, funds transfer and so on. The limits are shown per transaction and for daily and weekly transactions. The transaction limits can be modified by accessing the edit option for that account.
Users
The Users tab lists the following details of the users associated with a contract:
- Name
- Primary Customer ID
- Username
- Status
Click Add User to associate more signatories. You can add users either from the customers associated with the contract or from the users available in the database.
Automated Addition of New Products
You can add an existing customer from the Related Customers list or Other Users. Following is the process to add users from related customers:
- In the Users section, click Add Users. The Search for a user to add to the contract appears.
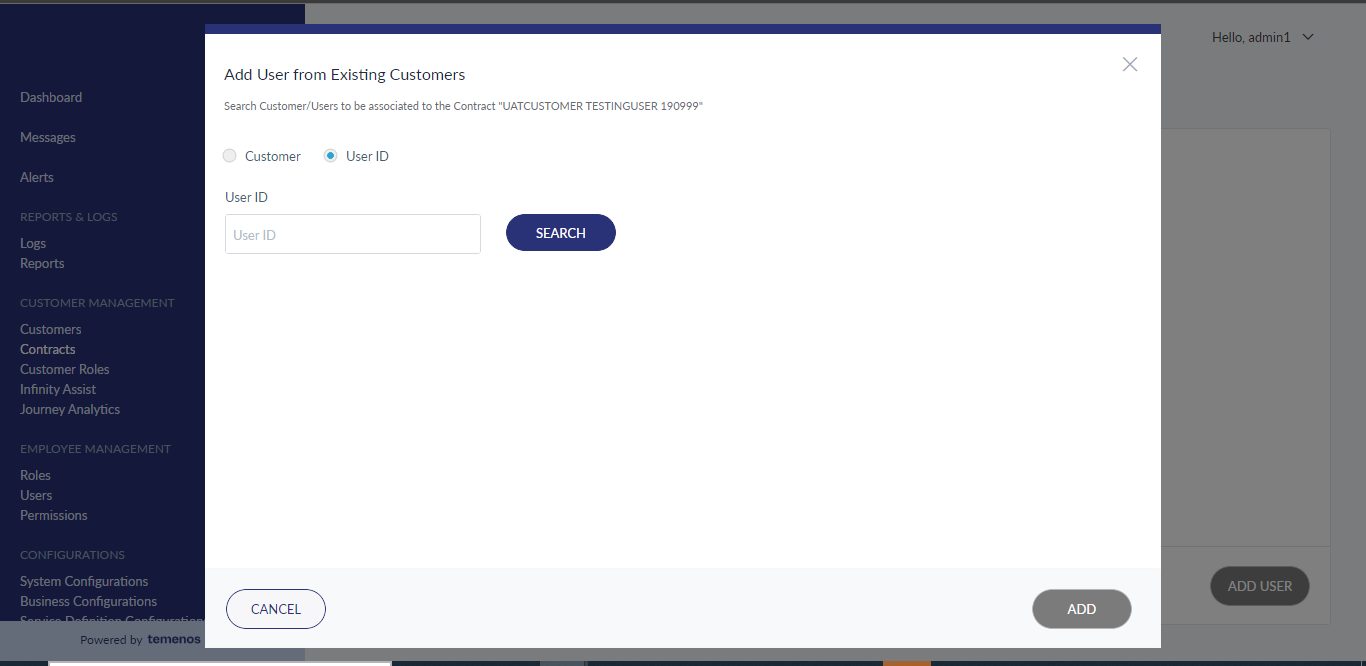
- Click on Add User from Existing Customer button. The Add User from Existing Customers screen appears as shown below:
- From the customers list, select a customer from the drop-down list. The list displays all the customers associated with the contract.
- Click Search. The list of customers related to the selected customer is displayed.
- Select a user and click Add.
- Associate the selected user with the customer IDs associated with the contract.
- From the Role list, select an appropriate role for the new user that is being added.
- Click Add User. The new customer is added to the Contract.
- At contract level, when a new account is added, a new flag is visible, so that the admin is aware that a new account has been added. It will be automatically selected as the default access type and at Contract level it is always Implicit.
- On the right-hand side of the screen, click or tap the contextual menu. The Edit User Access options - Accounts, Permissions, Limits, and Signatory Groups are displayed.
- On selecting the Accounts option, the user is directed to a screen where all the Accounts selected are displayed. The “Implicit Account Access” is auto-selected by default. If the user deselects the Implicit Account Access box, it gets converted to Explicit and on clicking the Save Changes button, the changes are saved.
- A pop-up appears confirming that the User Permissions and Limits have been updated successfully.
- Following is the process to search related users:
- Click Search Other Customers / Users. The Search screen appears.
- Provide any of the following search criteria:
- Customer ID
- Customer Name
- User ID
- Date of Birth
- Tax ID
- Email ID
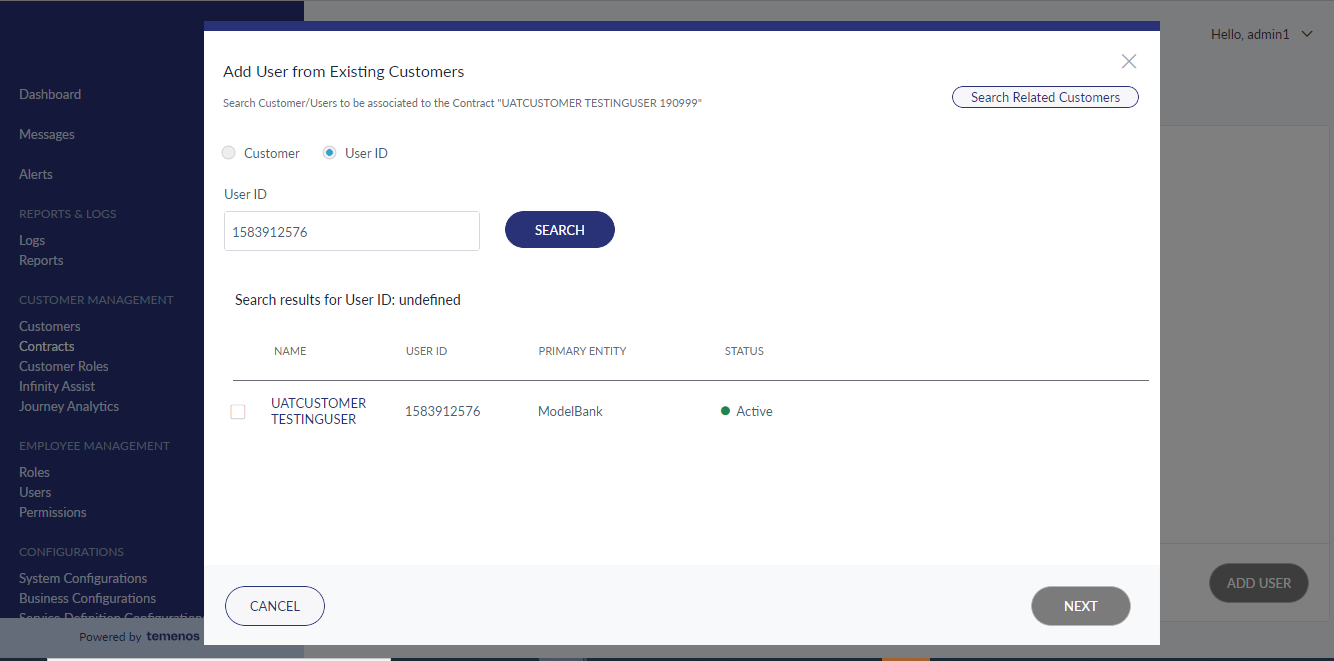
- Click Search. The search result displays the list of users matching the search criteria.
- Select a user and click Add.
- Associate the selected customer with the customer IDs associated with the contract.
- From the Role list, select an appropriate role for the new customer that is being added.
- Click Add User. The new customer is added to the Contract.
Add User from Existing Customers
This feature is used to add users who are not bank's customers.
Menu Path: Contract > User > Add Other User
Provide basic details of the user (First name, Middle name, Last name, Email ID, Phone No., DOB, Tax ID).
Assign the Role to the respective user.
- Service definition to the respective role will be as per contract (non-editable).
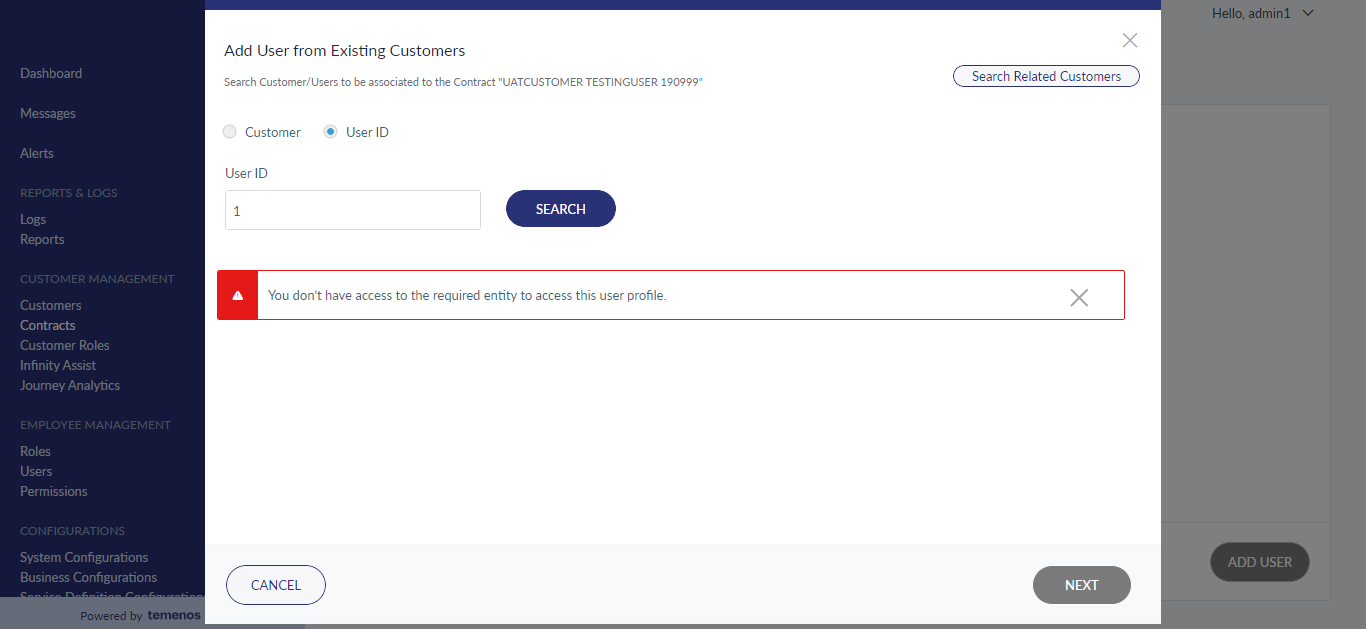
When User is Added from Another Entity
User will be able to use the feature in the Spotlight application:
- When you click on Add Users, you will get the option to search for a customer by selecting the legal entity from the same legal entity (as one can't enroll a customer from legal entity A, from a contract that belongs to legal entity B).
- When you select search by User ID option, system will let you search for a User from other legal entity (provided the bank staff has access to it).
- When the bank staff doesn't have access to the legal entity where the user belongs, system will show appropriate message as provided in the wire-frame.
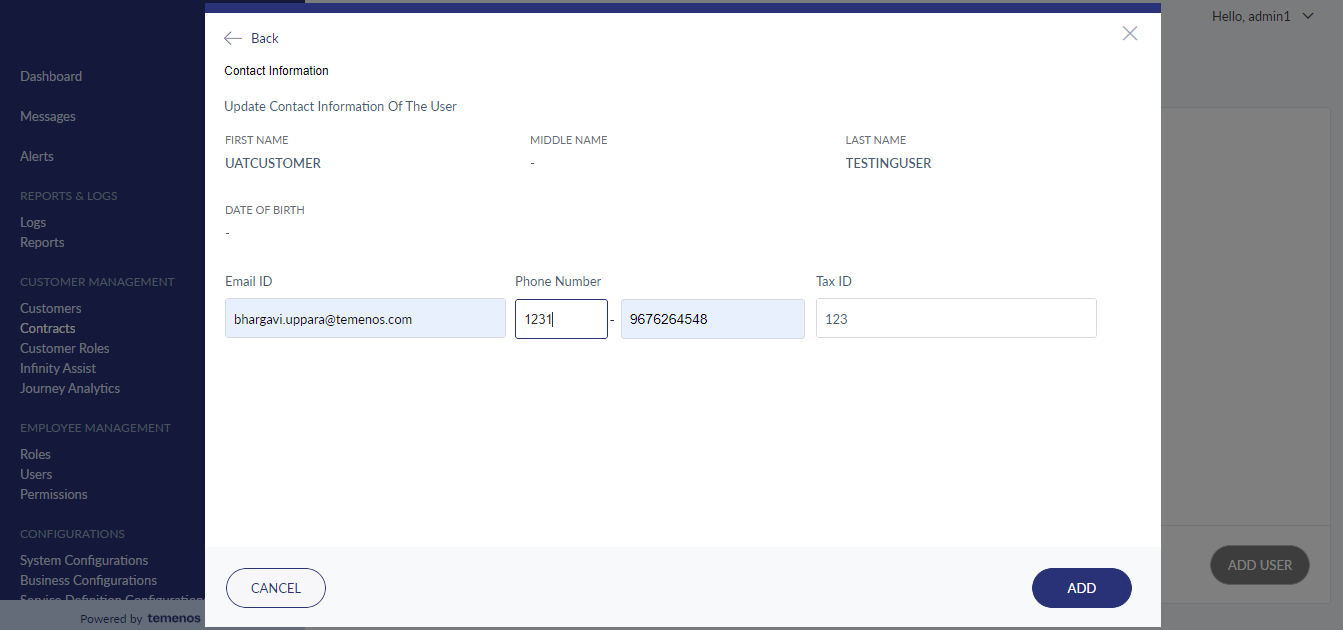
- Users may prefer to have different contact information (Email and Phone number) for different legal entity. So when you are adding a user from another legal entity, system will capture the contact information - Email and Phone Number.
- Users primary identification number will be different for different legal entities, so system will capture tax ID when you are adding a User from another legal entity.
- Since user basic information like first name, middle name, and last name will not change from legal entity to legal entity, previously provided information can be retained.

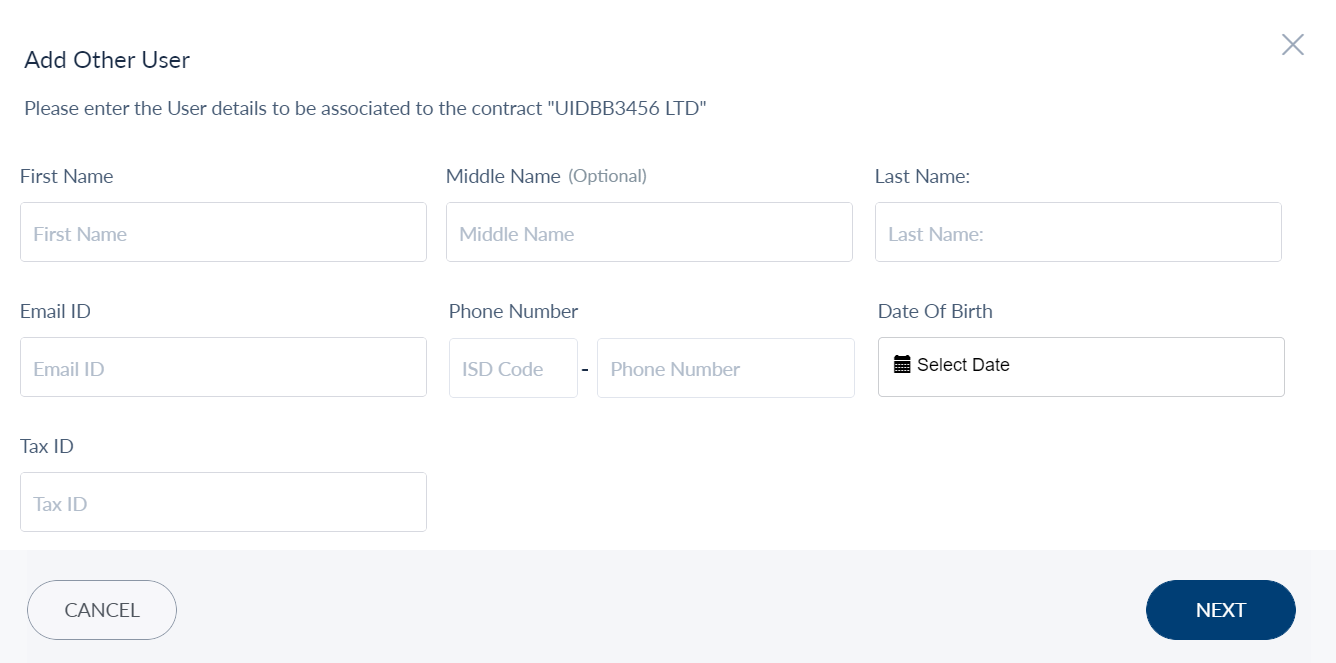
Add Other User
- In the Users section, click Add Users button.
- The Search for a user to add to the contract appears.
- Click Add Other User button. The Add Other User screen appears as shown below:
- It is mandate to enter the following details and click Next:
- First Name
- Middle Name (optional)
- Last Name
- Email ID
- Phone Number
- Date of Birth
- From the Roles list, select an appropriate role for the new customer that is being added.
- Click Add User. The new customer is added to the Contract.
- In addition, you can also view the Edit User Access options such as Accounts, Permissions, Limits, and Signatory Groups by following the below steps:
- On the right-hand side of the screen, click or tap the contextual menu. The Edit User Access options - Accounts, Permissions, Limits, and Signatory Groups are displayed.
- Select the required option and click on Save Changes button. The app displays the saved changes.
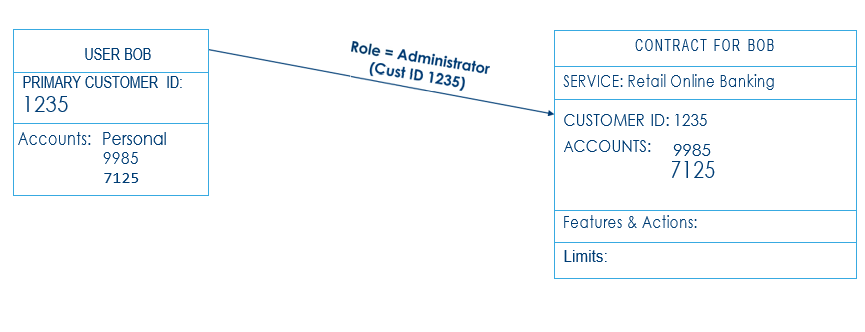
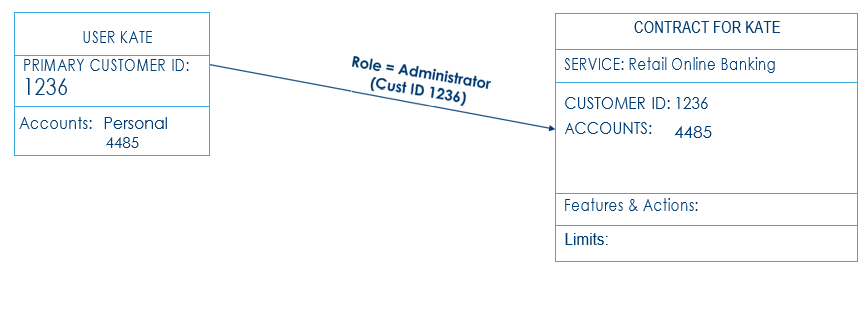
Joint Account - Scenario
- Customer Bob, a retail customer of the bank, has access to online banking for his personal accounts. His Customer ID is #1235.
- Bob has several accounts, including Account #7125, which he jointly owns with his wife Kate.
- Kate is also a customer of the bank. She has customer ID #1236. She has some personal accounts as well as Account #7125, which she jointly owns with Bob.
- Bob is the 'primary owner' of the account, and Kate is the 'joint owner.'
- Bob and Kate do not have access to Online Banking.
- The following set of use cases detail how the bank can set up online banking for the joint accounts based on the following:
- Whether Bob and Kate self-enroll or ask the bank to do the enrollment.
- Which of the two individuals is enrolled in online banking first.
Use Case - 1
Assisted Enrollment for Bob and Kate. Bob is enrolled first.
Bob and Kate have other accounts besides the joint account.
- Bob first requests the bank for online banking access for himself. The bank needs to enroll Bob.
- Kate does not have online banking access yet.
- After Bob has been enrolled, Kate requests the bank for online banking access. Kate has a personal account and a jointly-owned account with Bob.
- The bank enrolls Kate as well via the Spotlight application.
Step 1 - Enrolling Bob for Online Banking
- Since Bob needs online banking access to his own accounts, the bank can search for the "Customers" section for Bob's customer ID (1235).
- On the details page, an Enroll Now option will be present.
- Select a service and a role.
- By default, all the accounts (**), including the joint account (#7125), will be added to Bob's
- contract.
- This step will create a contract for Bob & an online banking user for Bob.
Step 2 - Enrolling Kate for Online Banking
• Since Kate needs online banking access to her accounts, the bank can go to the "Customers" section and search for Kate's customer ID (1236).
- On the details page, an Enroll Now option will be present.
- Select a service and a role.
- Since account #7125 is already in a different contract (Bob's contract), this account will not be listed for Kate.
- This step will create a contract for Kate (for all accounts other than the joint account and an online banking user for Kate.
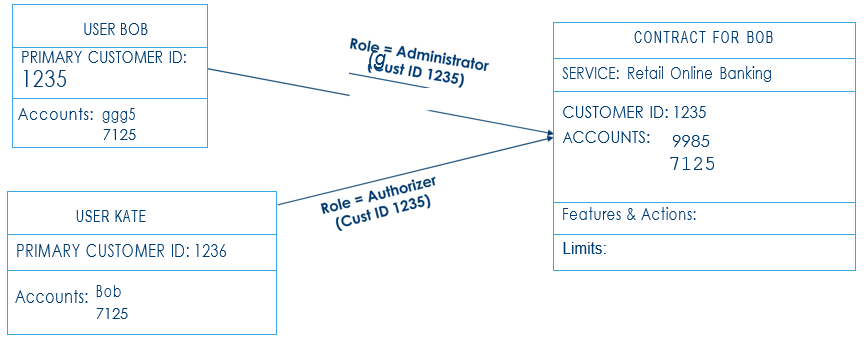
Step 3 - Enrolling Kate in Online Banking on the Joint Account
- The bank needs to open the contract for Bob and click the Users tab
- From there, the bank needs to "add a user from an existing customer" and search for Kate's customer ID #1236
- Kate is given a role that says "Authorizer" on Bob's customer ID (#1235).
- The bank needs to go to the user details -> accounts section, keep only the joint account selected, and remove access to all the other accounts.
- Kate is then added as a user on Bob's contract. Bob's contract will now have two users.
Use Case - 2
Assisted Enrollment for Bob and Kate Bob is enrolled first.
Kate has no other accounts besides the joint account.
- Bob first requests the bank for online banking access for himself. The bank needs to enroll Bob.
- Kate does not have online banking access yet.
- After Bob has been enrolled, Kate requests the bank for online banking access. Kate has no personal accounts other than the jointly owned account with Bob.
- The bank enrolls Kate as well via the Spotlight application.
Step 1 - Enrolling Bob for Online Banking
- Since Bob needs online banking access to his accounts, the bank can go to the "Customers" section and search for Bob's customer ID (1235).
- On the details page, an Enroll Now option will be present.
- Select a service and a role.
- By default, all the accounts (refer to note on accounts that are fetched for contract creation including the joint account (#7125), will be added to Bob's contract.
- This step will create a contract for Bob and an online banking user for Bob.

Step 2 - Enrolling Kate in Online Banking on the Joint Account
- The bank needs to open the contract for Bob and click the Users tab
- From there, the bank needs to "add a user from existing customer," search for Kate's customer ID #1236.
- Kate is given a role that says "Authorizer" on Bob's customer ID (#1235).
- The bank needs to go to the user details -> accounts section, keep only the joint account selected, and remove access to all the other accounts.
- A new user Kate is then created and added as a user on Bob's contract. Bob's contract will now have two users. Kate will have no contract of her own.
- If the bank goes to the "Customers" section and searches for Kate's customer ID (1236).
- On the details page, an Enroll Now option will be present.
- However, since account #7125 is already in a different contract (Bob's contract, this account will not be listed for Kate. This will lead to an error since no other account exists to create a contract for Kate.
- The bank must follow the previous slide's instructions for this setup.
Use Case - 3
Assisted Enrollment for Kate and Bob Kate is enrolled first.
Bob has another account besides the joint account.
- Kate first requests the bank for online banking access for herself. The bank needs to enroll Kate.
- Bob does not have online banking access yet.
- After Kate has been enrolled, Bob requests the bank for online banking access for himself. Bob has a personal account as well as a jointly-owned account with Bob.
- The bank enrolls Bob as well via the Spotlight application.
- This is exactly the same as Use Case - 1. The joint account will be added to Kate's contract in this case since Kate is being enrolled first.
Use Case - 4
Assisted Enrollment for Kate and Bob Kate is enrolled first.
Bob has no other accounts besides the joint account.
- Kate first requests the bank for online banking access for herself. The bank needs to enroll Kate.
- Bob does not have online banking access yet.
- After Kate has been enrolled, Bob requests the bank for online banking access for himself. Bob has
- No other personal account. He only has the coconut he jointly owns the coconut with Kate.
- The bank enrolls Bob as well via the Spotlight application.
- This is exactly the same as Use Case - 2. The joint account will be added to Kate's contract in this case since Kate is being enrolled first. Bob will not have any contract of his own.
Signatory Groups
The signatory group component facilitates you to view the list of users assigned for each signatory group within the contract. The signatory group details include:
- Customer ID (applicable for customer-centric core)
- Tax ID
- Address
In the Signatory group screen, you can view the list of users assigned to each signatory group. Further, you can add, edit, or delete a signatory group. Click the forward arrow icon to view the list of signatory groups and the total number of users assigned for each signatory group.
The Signatory Group details include:
- Group Name
- Group Description
- Number of Users
Tip: You can sort the signatory group by clicking the Sort (make sure that Sort is the name used in the industry) icon .
View Signatory Group: You can view the signatory group and the total number of assigned users within a contract. To view a signatory group, follow the below step:
- On the Signatory Groups list, click on a group you want to view. Profile details of the group appear.
You can perform the following:
- Add Users
- Edit Signatory Group
- Delete a Signatory Group
Add a New Signatory Group:You can add a new signatory group and then assign new or existing users. To add a signatory group, follow the below steps:
- On the Signatory Groups list, on the right-hand side, click Add.
- The Basic Details screen appears.
- Enter the Group Name and Description in the respective fields and click Next.
- A new screen to add a user(s) for the signatory group appears.
- Click Add Users.
- The Add Users to the Signatory Group “Manager” screen appears.
- Enable the check-box corresponding to the user you want to add and then click Add Users.
- A confirmation pop-up message appears.
- Add the user to only one signatory group for a particular customer under contract.
- Add users to multiple signatory groups but not for the same customer under contract.
Delete a User from the Signatory Group: To delete a user from the Signatory Group, perform the following steps:
- On the Contracts screen, click on the Signatory Groups tab. The app displays the list of signatory groups associated within the contract.
- Click on any of the signatory group to view the total number of users associated with it.
- In the Users list (correct the name as required), click the Recycle bin icon next to the user you want to delete. A confirmation message appears:
- Click Yes Remove. The user is removed from the Signatory Manager group.
- Signatory Group can be deleted when it is not associated with any approval rule or has no pending transaction.
Edit a Signatory Group: You can edit a signatory group and the assigned users within the contract. To edit a signatory group, follow the below steps:
- On the Signatory Groups list, for the group, you want to edit, click the Edit icon.
- The Basic Details screen appears.
- Modify the required details and click Update Group.
- A confirmation pop-up message appears. In addition, the app auto-displays the modified details under the basic details screen.
Delete a Signatory Group: To delete a signatory group, follow the below steps:
- On the signatory groups list, click the Recycle bin icon, present on the right side of the windowpane. A confirmation pop-up screen to delete a signatory group appears as shown below:
Approval Matrix
Use the feature to edit the details of a selected contract.
Setting-Up of Approval Matrix at Customer ID Level for the User
The user can set-up the approval matrix for a contract at Customer ID level.
Approval Matrix – Configured by User
The Approval Matrix can be configured based on the user:
- Click on the Approval Matrix tab.
- By clicking this, View by Customer screen opens. Here, the customer ids are present within the drop-down. From the drop-down, the approval matrix for all the three-customer ids appears. For example, if the user selects Temenos Global, the approval matrix for the first customer id is selected and so on and so forth.
- The Approvals Configured By option can be changed by clicking the Settings icon. The user can choose the User-based type of approval matrix for the Customer.
- On choosing a different type of approval matrix an appropriate warning message is shown to the user via a confirmation pop-up.
- For this customer id, these are the approval rules. These can be either turned on or off.
- By clicking the off button, a pop message appears.
- By clicking the Yes Proceed button, a success message appears. All the approval rules will be disabled and will remain off temporarily till the time it is turned on again.
- By clicking the Enable Approval Rules, all the approval rules will be enabled for all the features.
- All the features that are enabled for the Customer ID are listed with their status (Active / Inactive).
- The number of monetary and non-monetary actions are listed under the name of each feature with an icon each to make the distinction between monetary and non-monetary actions.
- To view the approval rules that are set-up for each action, the user should expand the feature.
- Click on the Add button under a particular action, the approval rules can be viewed.
- For a particular feature action, the Maximum Limit (Per Transaction / Daily / Weekly) is mentioned on the top. The limits can be set in three different ways: Up to, Between, and Above.
- The currently selected rules are displayed.
- Click on the Add Approvers link to add approvers for the selected range.
- The Add Approvers screen contains the following:
- Limit Range.
- Select Number of Approvals Rule: This allows the user to select any one of the following rules: Any one approval, Any two approvals, Any three approvals or All approvals.
- Select Approver: This allows the user to search for an approver by using the Name / Username.
- A warning message is displayed if sufficient approvers are not selected for the rule and the user is blocked from proceeding further.
- Click on Save Changes button.
- If there are no Approvers available in common at the Customer ID level, then an appropriate message is shown to the user when he/she clicks on Add Approvers: “There are no approvers available at the customer level. Please set up approval limits at account level”.
- If No Approvals Required rule is clicked, then the Add Approvers section appears as N/A.
- Click on View Approvers to view the approvers.
- The user can change the configuration by clicking on the settings icon in the View Contracts page.
- By changing the Approvals Configured By option, a pop-message appears.
- Click Yes Proceed, to make the changes. After changing the configurations, all the approval rules configured will be lost.
For non-monetary actions, the user can view the Approval Required in form of Yes / No and the Approvers.
Setting-Up of Approval Matrix at Account Level for the User
- The user can also set-up the approval matrix for a contract at Account level.
- By clicking the View Accounts button under a particular Customer ID, all the account level approval rules for that Customer ID will be seen.
- The configuration of approval rules at an account level remains the same as mentioned above for Customer ID level.
For all the new accounts that are created under a Customer ID and added to the contract, the customer ID level rules must apply by default.
Setting-Up of Approval Matrix at Customer ID Level for Signatory Groups
The user can set-up the approval matrix for a contract at Customer ID level.
Approval Matrix – Configured by Signatory Groups
The Approval Matrix can be configured based on the Signatory groups:
- Click on the Approval Matrix tab.
- By clicking this, View by Customer screen opens. Here, the customer ids are present within the drop-down. From the drop-down, the approval matrix for all the three-customer ids appears. For example, if the user selects Temenos Global, the approval matrix for the first customer id is selected and so on and so forth.
- The Approvals Configured By option can be changed by clicking the Settings icon. The user can choose the Signatory Groups type of approval matrix for the Customer.
- On choosing a different type of approval matrix an appropriate warning message is shown to the user via a confirmation pop-up.
- For the above-mentioned customer id, these are the approval rules. These can be either turned on or off.
- By clicking the off button, a pop message appears.
- By clicking the Yes Proceed button, a success message appears. All the approval rules will be disabled and will remain off temporarily till the time it is turned on again.
- By clicking the Enable Approval Rules, all the approval rules will be enabled for all the features.
- For all the features that are enabled for the Customer ID are listed with their status (Active / Inactive).
- The number of monetary and non-monetary actions are listed under the name of each feature with an icon each to make the distinction between monetary and non-monetary actions.
- To view the approval rules that are set-up for each action, the user should expand the feature.
- Click on the Add button under a particular action, the approval rules can be viewed.
- For a particular feature action, the Maximum Limit (Per Transaction / Daily / Weekly) is mentioned on the top. The limits can be set in three different ways: Up to, Between, and Above.
- The rules that are currently selected is displayed.
- Click on the Add Condition link to Add the Signatory groups.
- The Add Condition screen contains the following:
- Range Type, Range of Values, Number of Approvals, Signatory Group, and Approval Condition.
- The range for which the condition is being configured is mentioned on the top.
- For the first row it is only possible to pick the range type Up to or Above.
- Once the user enters a value in the Up to field the above field is populated by default.
- The - and + symbols allows the user to decrement or increment the number of approvals.
- Signatory Group field contains a drop-down which allows the user to choose the appropriate signatory group.
- A warning is shown when the signatory group selected has insufficient number of approvers (or the users who are in it do not have the requisite permissions).
- Add condition lets you add AND and Or to the previously entered rule and augment the condition. Add AND or Or conditions for joining rules within a single condition.
- A user can enter a combination both AND and Or conditions to create a complex condition.
- Click on the Save Changes button to save the changes or click on the Cancel button to cancel the changes.
- A delete icon is available against all the rules except the last Above condition.
- If there are no conditions added and the user tries to add the approval rule, a pop-up message is shown along with the warning icon next to Add Condition to inform the user that no condition has been added.
- After the condition has been added, an Edit Condition button is visible.
- After all the conditions are added click on Add Approval Rule button, if there are any gaps in the range of the approval matrix then an error message pops-up.
- Click on Save Changes button.
- If there are no Approvers available in common at the Customer ID level, then an appropriate message is shown to the user when he / she clicks on Add Approvers: “There are no approvers available at the customer level. Please set up approval limits at account level”.
- If No Approvals Required rule is clicked, then the Add Condition section appears as N/A.
- Click on the View Approvers to view the approvers.
- The user can change the configuration by clicking on the settings icon in the View Contracts page.
- By changing the Approvals Configured By option, a pop-message appears.
- Click Yes Proceed, to make the changes. After changing the configurations, all the approval rules configured will be lost.
For non-monetary actions, the user can view the Approval Required in form of Yes / No and the Approvers.
Setting-Up of Approval Matrix at Customer ID Level for Signatory Groups
The user can set-up the approval matrix for a contract at Customer ID level.
- The user can also set-up the approval matrix for a contract at Account level.
- By clicking the View Accounts button under a particular Customer ID, all the account level approval rules for that Customer ID will be seen.
- The configuration of approval rules at an account level remains the same as mentioned above for Customer ID level.
For all the new accounts that are created under a Customer ID and added to the contract, the customer ID level rules must apply by default.
Edit Contract Details
Approval Matrix can be configured at either by Customer ID level or by Account level.
Menu path: Contract > Search a contract > Click a contract row from the list > Edit
The edit screen is similar to the add a contract screen with the provision to modify the details. Make the changes on the following tabs as required:
- Accounts - Adding more accounts does not directly make them accessible to all the users within the contract. Access to the accounts must be given to the relevant users only. Removing accounts, dissociates them from the contract and from the users.
- Contract Details - The business type and Service Definition cannot be changed once users have been created for the contract with roles that are specific to the selected business type.
- Assign Features - Adding more features does not directly make them accessible to all the users within the contract. Access to features must be given to the relevant users only. Removing access to features, makes the feature unavailable for all the users of the contract.
- Assign Limits - Changing the limits associated with the contract may change the maximum transaction limits for the users associated with the contract.
Make the required changes and click Update to save the details. The application displays a message that the details are saved successfully.
- You can cancel the process at any time. The changes are not saved.
- If an account mapping is removed for a company, the particular account association is removed for all the business users of the company as well.
- The application displays an appropriate message when an account mapping to a company is removed.
Manage Enrollment Requests
Business Enrollments through the Online Banking application may either be auto approved or require review and approval by the Financial Institution. This is controlled through the “Business Enrollments Approvals” setting in Business Configuration.
If the Financial Institution has disabled the auto-approval, the Business Enrollment requests that are raised through the Online Banking Application are sent for review to the Bank and are visible in Spotlight. The Bank Administrator can either approve or reject them by accessing the Enrollment Requests section.
Click Enrollment Requests, to view all the requests that are pending for approval.
The following information is displayed about each request:
- Contract ID: Unique identifier created for a contract in the banking core.
- Company Name: Name of the company requesting for enrollment.
- Business Types: The type of business that the company owns. You can add more business types from the Business Types section.
- Submitted On: The date on which the request was raised.
- Submitted By: The name of the user who raised the request.
This information is available under the Pending tab and this tab is selected by default.
Select the required company to view the detailed information about the company.
You can view the following additional information about the company when you select one:
- Service: Name of the service definition. For example, Sole Proprietor, Partnership, LLC etc.
- Service Type: Displays whether the service definition is related to Business Banking or Retail Banking. For example, TYPE_ID_RETAIL, TYPE_ID_BUSINESS.
- User Details: Displays the information about the user who raised the enrollment request. You can view the details like First Name, Last Name, Customer ID, SSN and DoB.
- Accounts: The accounts associated with the company with their respective details like Customer ID, Tax ID, Address, and the accounts associated with the company in that contract.
Based on the information provided, you can either Approve the enrollment request or Reject it. When you reject a request, the Reason to Reject window appears. Provide a valid reason for rejecting the request and click Reject.
When you approve an enrollment request the Company is enlisted the Companies module, the business user’s profile is created, the user is notified that the enrollment request is accepted. The user is sent an email with instructions to activate his profile.
When you reject an enrollment request, the request is listed in the Rejected tab. Click the Rejected tab if you want to view the list requests that were rejected.
Apart from the information displayed in the Pending tab, following are the additional information available here:
- Rejected On: The date on which the request was rejected.
- Rejected By: The name of the bank staff who rejected the request.
Similar details appear when you select a company to view the details in the Rejected tab as viewed in the Pending tab with an additional field for Rejected Reason.
If the Administrator has enabled the Auto Approval option in Business Configuration, a note is displayed on top of the page stating "All the upcoming requests will be auto approved" and all the enrollment requests received are approved automatically.
Create Contract - Multi-Entity
- As a bank admin, you will be able to create Contracts for the legal entity you have access to. You can create and manage Contracts to enroll the customers for the legal entity they belong.
- Use the feature to create a banking contract.
Menu path: Customer Management > Contracts > Create Contract for the legal entity you have access to
- Log in to the Spotlight application.
- Click on Contracts under Customer Management.
- Click on Create Contract for the Legal Entity you have access to for creating a contract.
When a user has access to more than one legal entity, the user will be assigned with one default legal entity. In such case, the system will direct you to your default legal entity, with a drop-down to switch between the legal entities you prefer.
Steps to create a new Contract will remain the same as it is today and following items that you select during Contract creation will be specific to the legal entity selected from the legal entity drop-down.
- Services
- Customers
- Accounts
- Features and Actions
- Limits
- While setting up limits, system should consider it in the terms of currency configured for the selected legal entity. (Each legal entity will be assigned with one base currency during Onboarding stage).
- Currency format shown under limit section should depict the currency assigned to the selected legal entity.
- Once the contract is created, it will be available only within the legal entity it belongs.
Limit Increase : When limits are increased at the Contract level, it will not impact on Customer and Customer Role level. The user needs to change them manually.
|
|
Feature |
Service Definition |
Contract |
Customer Role |
Customer |
|---|---|---|---|---|---|
|
Feature |
Change at |
No Impact |
No Impact |
No Impact |
No Impact |
|
Service Definition |
NA |
Change at |
No Impact |
No Impact |
No Impact |
|
Contract |
NA |
NA |
Change at |
No Impact |
No Impact |
|
Customer Role |
NA |
NA |
NA |
Change at |
No Impact |
Limit Decrease: When limits are decreased at the Contract level, it will impact on Customer level. The user need not change them manually.
|
|
Feature |
Service Definition |
Contract |
Customer Role |
Customer |
|---|---|---|---|---|---|
|
Feature |
Change at |
Limit auto-update |
Limit auto-update |
Limit auto-update |
Limit auto-update |
|
Service Definition |
NA |
Change at |
Limit auto-update |
No impact |
Limit auto-update |
|
Contract |
NA |
NA |
Change at |
No impact |
Limit auto-update |
|
Customer Role |
NA |
NA |
NA |
Change at |
Limit auto-update |
Update Contract - Multi-Entity
As a Bank Admin, you will be able to Edit / Update the existing contract that are already present in the system and when you do so, the changes that you do to the contract will not impact the contracts which are in the other legal entity.
Search Contract - Multi-Entity
As a Bank Admin, you will be able to search for an existing contract.
- When you access the contracts search page, legal entity selection should be the first option.
- Legal entity selection is mandatory.
- When you click on the legal entity drop-down, system will list all the legal entities that you have access to.
- When you have access to only one legal entity, it will be selected by default.
- When a you have access to more than one legal entity, the system will list the first legal entity (based on alphabetical order) with an option to switch to the legal entity you prefer.
- You will be able to select only one entity at a time to search and view the existing contracts.
Limits, Signatory Groups, and Approval Matrix - Multi-Entity
Signatory Groups
As a Bank Admin, you will be able to add signatory groups, assign users to signatory group under contracts.
- When you access signatory groups section, you will be provided with an option to add a new signatory group. The users that you assign to the signatory group will only be the users who are already a part of the customer.
Approval Matrix
As a Bank Admin, you will be able to configure approval rules in the currency assigned for your legal entity.
- When you add an approval rule for any monetary action, the system will show the appropriate currency format assigned to your legal entity on all currency text fields.
- The system will consider the value that you provide in terms of the currency that is assigned to your legal entity.
For instance, if the primary currency associated to your legal entity is Euro and you provide 100 as limit to any monetary action, then the system will consider the limit as 100 Euro whenever the limit is triggered.
When you have access to two legal entities which operates in different region and currency, then the system will consider the currency which is associated to the legal entity that you select during contract creation.
In this topic